Friday, August 22, 2014

HP Laserjet printer offline status problem

HP Laserjet printer offline status in user's pc problem:-

Problem: When the printer's status states "OFFLINE" inside user's PC, user could not print to printer.

Troubleshooting: Try the following actions:-

  1. Try add another copy of the same printer inside user's PC
  2. Try cancel all previous print jobs from user's PC
  3. Try cancel all print jobs from the printer's control panel.
  4. Try restart the printer & the HP Jetdirect (incl re-fastened the network cable on the jetdirect).

Tuesday, December 4, 2012

49.FF05 Service Error


HP describes these as 49.XXXX errors (without the suffix numbers after the . (dot)). The general description is that a critical firmware error has occurred, but it's usually not firmware, especially if the printer has been fine until recently. 

Usually it's corruption in the print stream for a particular print job, so it could be the program (does this happen with print jobs from a particular application or from all applications; have you installed new software or upgraded it recently for the application that causes the error if it's always the same application?), the driver (have you recently upgraded it?), data corruption in the connection to the printer (bad network or USB cable, etc.), or maybe the firmware.

If they're random, and you can clear them and bring the printer back to ready by clearing the print job out of the spooler, turning off the printer, then turning it on again, it's most likely corrupt data in a print job introduced by one or more of the factors above. If they're infrequent and not too much of a bother, you can just do that. 

More information - here's an HP support document on troubleshooting 49.XXXX errors: 

http://h20000.www2.hp.com/bizsupport/TechSupport/Document.jsp?lang=en&cc=us&taskId=110&prodSeriesId=83436&objectID=c01558499 

Sometimes but rarely, they can be corrected with a firmware upgrade IF your model's firmware is flashable, and IF the problem is in the list of fixes. 

Approach upgrading firmware cautiously since a firmware upgrade that doesn't install correctly can render the printer inoperable until you replace the firmware dimm with a new one. 

To check for an available upgrade, go to hp.com. 

Click Support & Drivers. 

Select "Download drivers and software (and firmware)". 

In the text box, type your model, ie: laserjet 2420d in your case. 

Click the arrow button to the right of the text box. 

At the next screen, pick your specific model if it's not already selected. 

At the next screen, If a link named Cross operating system (BIOS, Firmware, Diagnostics, etc.) is there, the firmware is flashable. Click it. 

If it's not, you would have to buy a new firmware dimm from HP to upgrade the firmware. 

Important - At the next screen, do not click on the Download button. Instead, click the named link for the firmware for your operating system. 

At the next screen, select the Readme tab. That contains all the information from all tabs. 

Important - The cautious part: Look for your specific error in the Fixes list in the Readme tab information. If it's not there, I'd recommend not installing new firmware. 

You can also contact HP directly for help. Just click your country here: 

http://welcome.hp.com/country/us/en/wwcontact_us.html 

I understand they now charge for phone support, but that chat and email support are still free.

Monday, November 5, 2012

How to Backup Thunderbird Email on Windows 7


How to Backup Thunderbird Email on Windows 7

Backing up Mozilla Thunderbird email on Windows 7 is a simple process of archiving your Thunderbird profile. Follow these steps to backup emails for Thunderbird on Windows 7:
Step 1 Close Mozilla Thunderbird
Step 2 Viewing Hidden Files and Folders
  • select Start menu
  • search “folder options” and select Folder Options
  • select View tab
  • select “Show hidden files, folders, and drives
  • select Apply
  • select OK to close
Step 3 Locate and Archive your Profile
  • select file explorer
  • navigate to C:\Users\[Your Username]\AppData\Roaming\Thunderbird\Profiles
  • locate *.profile (preceded with random 8 character set: ie. v03180j5.profile)
  • zip *.profile (right click v03180j5.profile and Add to Zip)*
* You’ll need to download and install a ZIP untility such as 7-Zip
Congratulations, you have just backed up your Mozilla Thunderbird email on Windows 7. You can now take this zipped file of your Thunderbird email and safely store. Please remember to remove the ZIP file from the Profiles directory.
If there was ever a time that you need to revert or pull this archive back into your profile, you’ll just need to take the files (ONLY the files) within your *.profile and set those in a new *.profile folder that would be created after a fresh Mozilla Thunderbird install.

Wednesday, September 12, 2012

Error to scan to Fuji-Xerox DocuCentre-IV C2260

Diagnosis:


  1. Unable to scan thru.
  2. Error message: 027-516
  3. Able to browse the network & Shared folder on the network

Solution:

To enable Net Bios

Windows 7:

  1. Go to START>Control Panel>Network & Internet>View Network Adapter
  2. Change Adapter Settings
  3. Right click on Local Area Connection
  4. Select TCP/IPv4>Properties
  5. Advanced
  6. WINS
  7. Check Enable Net Bios over TCP/IP>OK>DONE.

Reference: Fuji-Xerox Network Scanning: Error 027-516


As part of a test for removing legacy protocols from the network I disabled NetBIOS over TCP/IP to see if any system would be adversely affected.
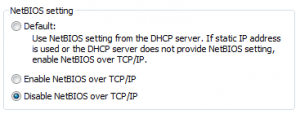
After disabling NetBIOS for the server used by our Fuji-Xeros
ApeosPort-II 4000 Photocopier, the Network Scanning feature was
unable to upload the scanned file to the SMB server. Instead it would
return a 027-516 error code.
To verify the problem I Enabled NetBIOS and it immediately started
working again.
I contacted Fuji-Xerox to check if they had a fix for the problem. I was advised that this can only be changed in
newer versions, ApeosPort >=3, and that is was considered a “Feature”. The only way for an AP-II device to
work with a server with NetBIOS disabled is to use the FTP transmit method.
After checking on one of our ApeosPort-III C3300, I found the page
mentioned that allows the setting to be changed.
It appears that the use of NetBIOS by the APII is hardcoded and
although it has DNS settings set, they are ignored for server name
resolution. Considering this Photocopier is still being produced and
sold I find it interesting that it relies on outdated protocols like
NetBIOS. (ApeosPort-II 3000, 4000, 5010, 6000, 7000 are the main
black and white photocopiers available to DET NSW Schools)


Monday, July 16, 2012

GOOGLE APPS: Here are a few tips for creating your password, and keeping it safe


  • Your password should be easy for you to remember without being obvious for someone else to guess.
  • Don't choose a dictionary word as your password.
  • Include a variety of characters, such as punctuation marks, numbers, and mix capital and lowercase letters.
  • Never tell anyone your password.
  • Never write down your password. Even if you don't think that somebody would know that it was your Gmail password if they saw it, think of a way to remember it so that you don't have to write it down.
  • Periodically change your password.

Google APPS: How to change your Esajp mail password


Here's how to change your Esajp mail password:
  1. Click the gear icon  in the upper right, then select Settings.
  2. If you're on a mobile device, switch to desktop view for the full list of settings.
  3. Open the Accounts and Import tab.
  4. In the 'Change account settings' section, click Change password.
  5. In the new window, enter your current password and your new password.
Make sure you create a unique password to help keep someone from breaking in to your account.Here are a few tips for creating your password, and keeping it safe:
If your password isn't working, you'll need to go through our password recovery process. Google Apps users, please contact your organization's IT admin for help with password recovery.

GOOGLE APPS: How to add others/coworkers calendar


  1. log in to your email
  2. from your email hit link calendar
  3. then there will be a new window/tab appeared with your calendar.
  4. On the left-pane of calendar window, you will find other calendars. 
  5. Under other calendars there's a box to add a co-workers calendar.
  6. Just type in coworkers name. For example: azizi. It will appear possible name for Azizi.
  7. You just select as desire.
  8. Then you are done.

Tuesday, June 26, 2012

320040 - How to: Use Ntdetect.chk to Identify Hardware Problems in Windows 2000

This step-by-step article describes how to use the debug version of Ntdetect.com (Ntdetect.chk) to help you to identify hardware problems that may prevent your computer from starting. 

If you are experiencing problems starting your computer because of a hardware problem, you can use Ntdetect.chk to determine the hardware component that may be causing the problem. Ntdetect.chk is located in the Debug.cab file from the Windows 2000 Resource Kit companion compact disc (CD). Open the Debug.cab file, and then extract the Ntdetect.chk file.

How to Use Ntdetect.chk to Identify Hardware Problems

This section describes two methods that you can use to identify hardware problems.

Method 1: Use Ntdetect.chk to Start the Computer from the Windows 2000 Setup Boot Disks

  1. Create a duplicate copy of Setup disk 1 from the Windows 2000 Setup boot disks.For additional information about how to create startup disks for Windows 2000, click the article number below to view the article in the Microsoft Knowledge Base:
    197063  How to Create Setup Boot Disks for Windows 2000
  2. Rename the Ntdetect.com file on the copy of the Windows 2000 Setup boot disk that you created in step 1 to "Ntdetect.bak."
  3. Extract the Ntdetect.chk file from the Debug.cab file on the Windows 2000 Resource Kit CD to the Windows 2000 Setup boot disk.
  4. Rename the Ntdetect.chk file on the copy of the Windows 2000 Setup boot disk to "Ntdetect.com."
  5. Insert the copy of the Windows 2000 Setup disk that you created in step 1 in drive A, and then restart the computer.

Method 2: Use Ntdetect.chk to Start the Computer from the Hard Disk

If you do not want to use the Windows 2000 Setup boot disk, use the following procedure to replace the Ntdetect.com in the root folder of your system partition. 

NOTE: Depending on the current state of your computer, you may have to start the computer in safe mode or use the Windows Recovery Console to perform the procedure that is described in this section. 

You can use the Recovery Console to help recover a Windows-based computer that either does not start properly or does not start at all. If safe mode and other startup procedures do not work, you may want to use the Recovery Console. Microsoft recommends this method only if you are an advanced user who can use basic commands to identify and locate problem drivers and files. Additionally, you must be an administrator to use the Recovery Console. For additional information about how to start Windows in safe mode, click the article number below to view the article in the Microsoft Knowledge Base:
281770  How to Perform Clean-Boot Troubleshooting for Windows 2000
To use Ntdetect.chk to start the computer from the hard disk:
  1. Rename Ntdetect.com to "Ntdetect.bak" in the root folder of your system partition.
  2. Extract the Ntdetect.chk file from Debug.cab file in the Windows 2000 Resource Kit CD-ROM to the root of your system partition.
  3. Rename Ntdetect.chk to "Ntdetect.com" in the root folder of your system partition, and then restart the computer.

How to View the Results

If you run the debug version of Ntdetect.com, hardware information is displayed when it is detected. To move to the next window, press any key. Continue until Setup stops responding (hangs). Review the contents of the window that is displayed when Setup stops responding to determine the hardware component that may be causing the problem.

The following is text is an example of the contents that may be displayed:
Detecting System Component . . .
Reading BIOS date . . .
Done reading BIOS date (1/20/2002)
Detecting Bus/Adapter Component . . .
Collecting Disk Geometry . . .
Detecting Keyboard Component . . .
After Ntdetect.com displays information about the components, press ENTER for Ntdetect.chk to continue. Ntdetect.chk displays information about the current nodes for the controllers and peripherals. You must press ENTER after you view each window.

NOTE: After you finish using Ntdetect.chk, Microsoft recommends that you rename Ntdetect.com to "Ntdetect.chk," and then rename Ntdetect.bak to "Ntdetect.com."

Troubleshooting

The HiddenSystem, and Read Only attributes are configured on Ntdetect.com when you install Windows 2000. You must clear these attributes to make the file visible. Use either My Computer, Microsoft Windows Explorer, or the command prompt to change these attributes.

How to Use Either My Computer or Windows Explorer to Change File Attributes

  1. Open My Computer or start Windows Explorer.
  2. Click Folder Options on the Tools menu.
  3. Click the View tab, click Show hidden files and folders in the Hidden files and folders section.
  4. Click to clear the Hide protected operating system files (Recommended) check box, click Yes, and then click OK.
  5. Click the Ntdetect.com file that is located in the root of the C drive.
  6. Click Properties on the File menu.
  7. Click to clear the Read Only check box and the Hidden check box in the Attributes box of theGeneral tab, and then click OK.

How to Use Either the Command Prompt or the Recovery Console to Change File Attributes

To use either the command prompt or the Recovery Console to change the file attributes, type attrib -s -h -r ntdetect.com, and then press ENTER. 

Friday, June 22, 2012

DELL OPTIPLEX 380 driver & other utilities download


System Utilities > Dell System Software
Chipset > Intel Chipset Software
Video Driver > Intel G41 (intel) Graphics Controller
Audio > Realtek ALC269 HD Audio
Network > Broadcom 57XX Gigabit Integrated
Hope that everything is satisfactory. If there are further enquiries or concerns, please feel free to contact us or drop me an email. We will be most glad to assist.
For any further technical information, products related support, latest news and  highlights, kindly click on the link to access our Dell Customer Support Site: http://support.ap.dell.com
Thank you.


Note: for esa users, please find the downloaded files from S:\Drivers\Desktop\Optiplex 380 - Windows XP 32 bit. TQ

Wednesday, June 20, 2012

How to synchronize the time with the windows time service in windows XP

W32tm /config /[/computer:<target>] [/update]

W32tm /resync

Due to server time was not updated. I manually change the server time & resync one by one to be available on the network by using command:-

Open CMD
Type: w32tm /resync /computer:computername <enter>
example:
w32tm /resync /computer:esapc00

The following error occurred: Access is denied. <0x0070005>

The following error occurred. The RPC Server is unavailable. <0x800706>

How to make sure the time at server is up to date?

Apply the following settings:

Open CMD
Type: w32tm /config /computer:esaserver /update /manualpeerlist:time.windows.com /syncfromflags:manual /reliable:yes <enter>

The command should completed successfully.


Could not copy & paste file to kingston controller 8GB or format it.

Error message: Write protected
Shared-Nothing happened.

Solution:

To change at Register Editor:

The registry file is downloadable at:

http://www.keepandshare.com/doc/4170618/disableusbwrite-zip-june-20-2012-11-58-am-1k?da=y

Unzipped the folder. Then run the file.
Filename: DisableUSBWrite.

Windows Registry Editor 5.00

HKEY_Local_Machine\system\currentcontrolset\control\storagedevicepolicies]
"Writeprotect"=dword:00000001

Tuesday, June 19, 2012

Could not open Microsoft Office Starter 2010

Could not open Microsoft Office Starter 2010

Error message: Repair Microsoft Office Click-to-Run.

Repairing Microsoft Office Starter 2010 - English was unsuccessful because an internet connection is required.

Solution 1:

  1. Close all programs.
  2. Restart PC 
  3. Re-login to your PC
  4. Open Microsoft Office program.
  5. The Microsoft should working fine now.

Tuesday, May 22, 2012

The system cannot log you on due to the following error: There is a time difference between the Client and Server. Please try again or consult your system administrator.


Cannot Log On If Time and Date Are Not Synchronized (kb232386)

When you attempt to log on to the network, you may receive the following error message:


The system cannot log you on due to the following error: There is a time difference between the Client and Server. Please try again or consult your system administrator.

Cause: This behaviour can occur if the time or date is not synchronized between your computer and the domain to which you are attempting to log on. If the client computer's time or date is not synchronized with the authenticating domain controller. Kerberos validation doesn not succeed. This occurs because of the variation in the time stamps between the AS_Req and AS_Reply between the client and server. Because Kerberos is the only form of logon authentication between two Windows 2000-based computers, the login does not succeed.


Resolution: To resolve this issue, log on to your computer locally using an account with administrative privileges and set the time and date to match the time and date on the domain controller(DC) that validates your logon. Below is list of steps that can be used to synchronize the time.


Click Start, Run
Type in CMD and click OK
At the command prompt type something similar to the following: NET TIME /DOMAIN:name /SET


Where "name" is the domain name being used by the computer. If you are not certain what the domain name should be replace name with "%userdomain%" without quotes.

Could not open Microsoft Office Starter


Just close everything, then restart PC. Then re-open the Microsoft Office Starter as usual.

Wednesday, May 9, 2012

AutoCAD2000: Error message: File_Name.ctb. You do not have permission to save in this directory.


Every time the user need to save the file in the plot styles folder by default (c:\Program Files\ACAD2000\Plot Styles\), this error message appeared: 
File_Name.ctb. 
You do not have permission to save in this directory (The directory C:\Program Files\ACAD2000\Plot Styles\).


Solution:


The user need to have permission to write on that folder. In order to do this, group this particular user in to Power Users group(local) as this group has the permission to write on to this folder. If the folder doesn't have the Power Users group(local), please add Power Users group and add the particular users to the particular group.
Basically, the user need to have the permission to write to be able to save into this folder.


Any problem? Email me at administrator@esajp.com & attention to FIST.

Thursday, April 12, 2012

Err Msg: The Referenced Account Is Locked Out and May Not Be Logged on to

Symptoms

When you try to log on to a backup domain controller (BDC) that is running Microsoft Windows NT Server 4.0, you may not be able to do so, and you may receive the following error message:

The referenced account is locked out and may not be logged on to.

Also, when you log on to the Microsoft Windows NT Server 3.51-based primary domain controller (PDC) on the same domain, and then try to connect to the BDC from the PDC, you may receive the same error message.

Cause

This behavior can occur if the PDC and the BDC are not correctly synchronized.

Resolution

To resolve this issue, synchronize the PDC and the BDC:


  1. Log on to the domain using an account that has administrative privileges.
  1. In Server Manager, click the name of the BDC in the Computer box.
  1. On the Computer menu, click Synchronize With Primary Domain Controller, and then click Yes to confirm the synchronization.
  1. In Event Viewer, check the system log in Event Viewer to make sure the synchronization was successful.

More Information:

When you gain access to the BDC using an Administrator account, you may see an Event ID 7023 error message in Event Viewer. Event ID 7023 indicates that access was denied with the Netlogon service.

Wednesday, May 18, 2011

Install Google Chrome for multiple user accounts : Install or update Google Chrome - Google Chrome Help

Install Google Chrome for multiple user accounts : Install or update Google Chrome - Google Chrome Help: "Install or update Google Chrome: Install Google Chrome for multiple user accounts


Windows instructions
As an administrator, you can install Google Chrome in Pack for all user accounts on a Windows computer (whereas the installer available at http://www.google.com/chrome only installs for the user account that you're logged into.) By doing so, you'll replace all other versions of Google Chrome that may already be installed on your computer for other user accounts.
Don't have administrator rights? Download Google Chrome for your user account at http://www.google.com/chrome
If you already have Google Chrome from http://www.google.com/chrome installed on your administrator account, make sure to uninstall it first before installing Pack's version.
After you've installed Google Chrome through Pack, users who've already installed Google Chrome in their user accounts will be notified that the browser has updated to a system-wide version the next time they sign in and open the browser. In some cases, they may need to recreate their profile information, such as bookmarks and browsing history, if they were formerly using a more recent version of the browser.

Mac instructions

You can install Google Chrome for all user accounts on your computer if you're signed in as an administrator. After you've downloaded Google Chrome.dmg from http://www.google.com/chrome, drag the Google Chrome icon to the Application folder to complete the system-wide installation."

Saturday, May 7, 2011

Page Tools: Plug-ins

Plug-ins


Plug-ins help the browser process special types of web content, like Flash or Windows Media files.
  • On Windows, Mac, or Linux? Google Chrome supports most popular plug-ins, including Adobe Flash Player, Adobe Reader, Java, Windows Media Player, Real Player, QuickTime, and Microsoft Silverlight.
  • On Chrome OS? Google Chrome supports Adobe Flash Player, the Google voice and video chat plug-in, and PDF.

Install plug-ins

If you allow sites to use plug-ins and Google Chrome detects that you're missing a plug-in for a particular page, it'll prompt you to install the plug-in at the top of webpage.
Click Install plug-in in the message. Some plug-ins begin the installation process by downloading a set-up file to your computer. For those plug-ins, make sure you confirm the download by clicking Save in the downloads bar that appears at the bottom of your browser window. Once the download has finished, restart Google Chrome by closing all open windows to complete the installation process.

Block plug-ins

All plug-ins are allowed by default (unless Google Chrome detects that they're outdated). Use the Content Settings dialog to block specific plug-ins. Follow these steps:
  1. Click the wrench icon wrench icon on the browser toolbar.
  2. Select Options (Preferences on Mac and Linux; Settings on Chrome OS).
  3. Click the Under the Hood tab.
  4. Click Content settings in the "Privacy" section.
  5. In the "Plug-ins" section, select "Block all." You can customize permissions for specific websites by clicking Manage exceptions.

Allow blocked plug-ins to run

If you have chosen not to allow plug-ins, you’ll see a blocked plug-in icon in the address bar whenever plug-ins have been blocked on a page. To adjust plug-in settings for the site, click the icon:
  • To always allow plug-ins for the site, click Always allow plug-ins in the menu that appears, then click Done. An exception will be added for the site.
  • To allow plug-ins on the site for just this one time, click Run all plug-ins this time.
  • To manage your plug-in settings for the browser, click Manage plug-in blocking.
Outdated plug-ins are blocked by default. You'll see a message at the top of the page whenever the browser has blocked outdated plug-ins on the page. Click Run this time in the message to let the outdated plug-in run (not recommended).
A gray box appears on the page where a plug-in has been blocked.

Disable specific plug-ins

You can also completely disable specific plug-ins. Unlike blocked plug-ins, you won’t be able to allow the plug-in to run on a given page. When you visit a page with a disabled plug-in, you’ll see the message “Missing plug-in” appear in its place.
To disable plug-ins, visit the Plug-ins page at chrome://plugins/. Find the plug-in you’d like to disable and click Disable. You can also re-enable disabled plug-ins on this page.
You can also reach the Plug-ins page by clicking Disable individual plug-ins in the "Plug-ins" section of the Content Settings dialog.

Tuesday, May 3, 2011

Import your messages or account from Outlook Express to Outlook

Applies to: Microsoft Office Outlook 2003


APPLIES TO
Microsoft Office Outlook® 2003
Microsoft Outlook® 2002
Microsoft Outlook® Express is a no-cost, basic e-mail program that is included with Microsoft Internet Explorer. You can import e-mail messages from Outlook Express into Outlook. The process you use depends on whether the two e-mail programs are installed on the same computer.
In Outlook Express, each folder corresponds to a group of stored messages; for example, the Outlook Express Inbox folder is a single file, Inbox.dbx. Conversely, Outlook stores each message as an individual file. If Outlook Express and Outlook are installed on different computers, you need to know this information so that you can find and copy the correct folder when needed.
To import e-mail messages, choose a procedure based on whether Outlook Express and Outlook are installed on the same or different computers.

Import messages from Outlook Express

  1. In Outlook, on the File menu, click Import and Export.
  2. Click Import Internet Mail and Addresses, and then click Next.
  3. Click Outlook Express.
  4. Select the Import mail check box.
  5. Click Next.
  6. Click Finish.
  7. To save a copy of the import summary to your Inbox, click Save in Inbox.
To transfer messages by using the Import and Export Wizard, you must first locate and copy the correct files from the computer where Outlook Express is installed to the computer where Outlook is installed.
NOTE Copying the Outlook Express information to a shared location won't work. You must copy the folder to the same computer where Outlook is installed.

COPY OUTLOOK EXPRESS FOLDER

  1. On the computer where your Outlook Express account is set up, in Outlook Express, on the Tools menu, click Options.
  2. Click the Maintenance tab.
  3. Click Store Folder, and then note the entire path shown in the field in the Store Location dialog box.
TIP Record this location so that you can recall it later in this procedure. You can do this quickly by selecting the information in the field, pressing CTRL+C to copy, and then opening Microsoft Notepad and pressing CTRL+V to paste it there.
  1. If necessary, modify the default view in Windows Explorer so that you can see hidden folders. The Outlook Express folder is located in a hidden folder.
  1. Click Start, and then click My Computer.
  2. On the Tools menu, click Folder Options.
  3. Click the View tab, and then click the Show hidden files and folders option.
  1. Double-click My Computer on your desktop.
NOTE If My Computer is not on your desktop, click Start, point to Programs, point to Accessories, and then click Windows Explorer.
  1. On the Tools menu, click Folder Options.
  2. Click the View tab, and then click the Show hidden files and folders option.
  1. Browse to the location that you found in the Store Location dialog box.
  • Do one of the following: Copy the entire Outlook Express folder to removable media, such as a floppy disk, DVD, or portable memory device, and then copy it to the computer where Outlook is installed.
NOTE When you transfer this information to the computer with Outlook, the destination is not critical, because the information will only be stored there temporarily. Copy it to a place that you can easily remember and find.
  • Copy the entire Outlook Express folder to a network location that the computer with both Outlook and Outlook Express has access to.
  1. On the computer where Outlook is installed, open Outlook Express. If prompted to create an e-mail account, click Cancel.
  2. On the Tools menu, click Options.
  3. Click the Maintenance tab.
  4. Click Store Folder and then click Change.
  5. Browse to the location where you copied the Outlook Express folder, and then click the folder that you copied in step 6. Click OK.
  6. To close the Store Location dialog box, click OK.
  7. When prompted to use the new messages or replace them with messages from the old store location, click Yes to switch to that store.
  8. Close Outlook Express, and then open it again to complete the process.

IMPORT OUTLOOK EXPRESS MESSAGES INTO OUTLOOK

  1. In Outlook, on the File menu, click Import and Export.
  2. Click Import Internet Mail and Addresses, and then click Next.
  3. Click Outlook Express.
  4. Select the Import mail check box.
  5. Click Next.
  6. Click Finish.
  7. To save a copy of the import summary to your Inbox, click Save in Inbox.

Import account information

  1. In Outlook, on the File menu, click Import and Export.
  2. Click Import Internet Mail Account Settings, and then click Next.
  3. Click Outlook Express, and then click Next.
  4. Follow the remaining instructions in the Import and Export Wizard.